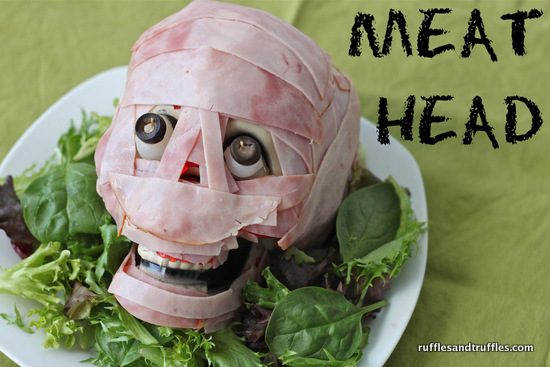
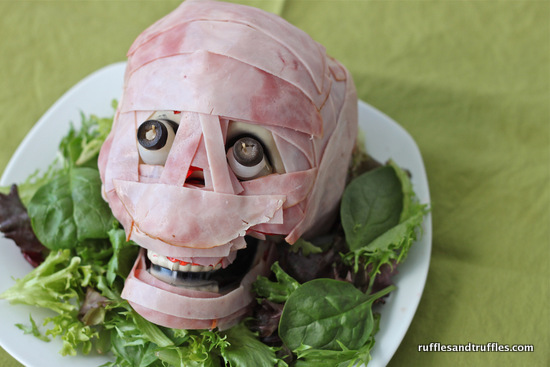
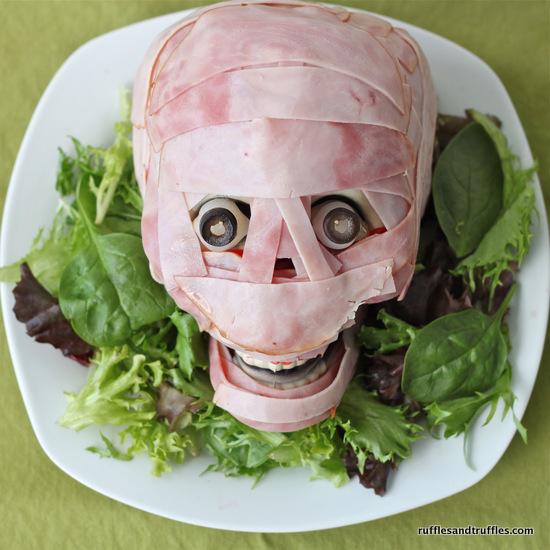
I don’t know if words can even describe how proud I am of today’s DIY tutorial. It’s just in time for Halloween, and it is sure to be a hit at your ghoulish gatherings. May I present to you…Meat Head: A Halloween DIY Tutorial…
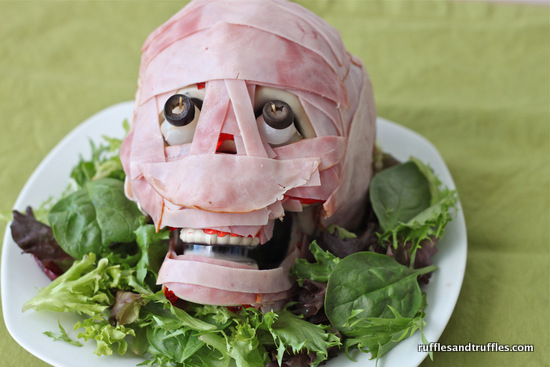
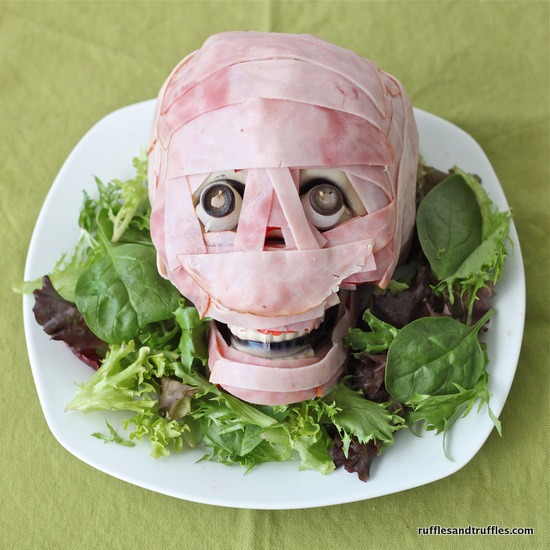
He’s oddly cute yet terrifying, and is the perfect centerpiece for your Halloween party table.
One of the great things about Meat Head is that he is pretty easy to assemble, and you can put him together for only a few dollars – you can’t beat that! Actually, almost all of the ingredients for this project came from the dollar store (or were already in my home)…
Meat Head
Ingredients
Plastic skull
1 package jello (red in color: I used strawberry)
1/2 lb lunch meat ham, sliced thin
2 cocktail onions
2 black olive slices
Toothpicks
Lettuce, for garnish
Plate/tray for display
Instructions
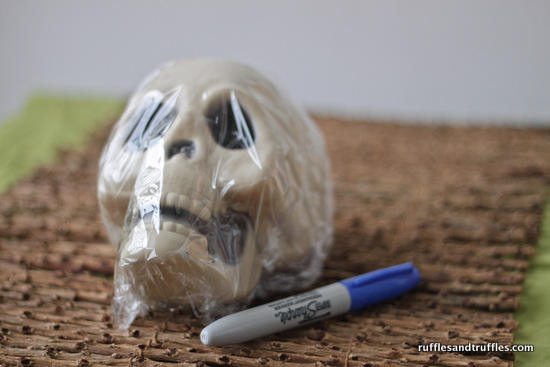
1. Begin with a plastic skull. I found mine at my local dollar store. Wash the surface thoroughly with soap and water – Meat Head is technically edible, so you want to make sure he is clean enough to eat off of!
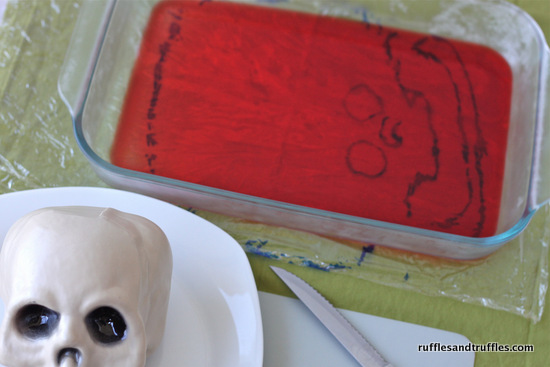
2. Prepare the jello in a clear 9×13″ pan! I used a box of strawberry jello, but any red color/flavor will do. I prepared the jello according to the package directions, but used only HALF of the water as instructed. You want your jello layer to be sticky so it will adhere to the plastic skull. My jello was about 1/4″ thick in the pan; the thicker the jello, the harder it will be to stick on to your skull!
Now, you sit and wait for your jello to set in the refrigerator…
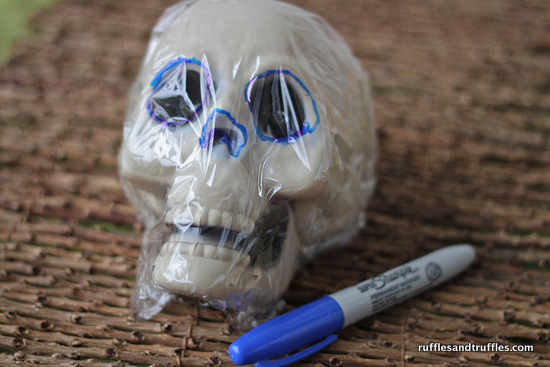
3. Meanwhile, you can take this optional step to help you with the jello laying process. Wrap the plastic skull as tightly as possible with plastic wrap. It doesn’t have to be perfect, but attempt to get the face portion as smooth as you can.
4. Use a permanent marker to outline the eyes, nose, and mouth of the skull (the portions of the skull that you will want uncovered). This outline will help when you slice the jello to lay on top of the skull. Unwrap the skull, smooth out the plastic wrap, and place the wrap underneath the clear glass pan with the prepared jello.
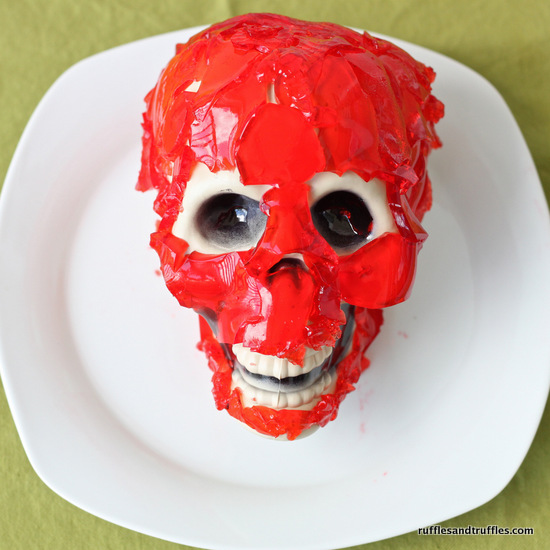
5. Use a sharp knife to slice pieces of the jello out of the glass dish and place directly on the plastic skull (which you should now have sitting on the plate/tray you will be using for presentation). I used the larger slices for the large areas on top of the skull, and used my “guide” to slice smaller, hard to fit pieces (like the ones around the eyes/nose/mouth). The jello arrangement does NOT have to be perfect, so don’t worry about fitting slices together like puzzle pieces. When you’re finished, Meat Head should look a little like this: pretty scary already, right?
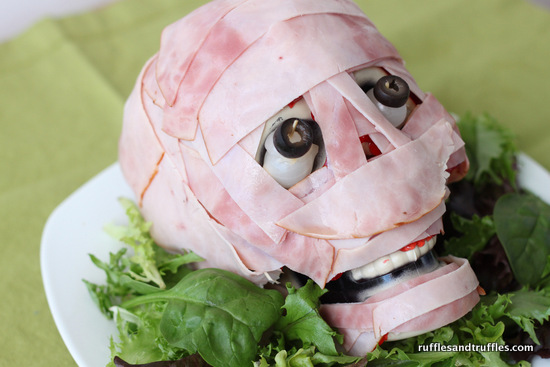
6. Next, place the lunch meat slices on a cutting board and slice into thick strips. I worked one slice at a time – slicing and placing firmly to form the meat to the shape of the skull. You’ll need to spend a little more time on the areas around the face (eyes, nose, mouth) to make smaller cuts that will allow the hollows not covered with jello to show. Work piece by piece to cover the entire skull in a few layers of ham, making sure to cover all of the areas with jello on them. If needed, use toothpicks to hold ham slices in place.
7. When your Meat Head is fully covered with ham slices, it is time to finish him with garnishes! For the eyes, take a cocktail onion, pierce with a toothpick so about 1/4″ of the toothpick is sticking out the top (I had to break my toothpick in half to make it short enough), and hang a slice of black olive on the toothpick to create the pupil. Place the eyeballs in the eye sockets of the skull.
8. Arrange lettuce leaves around the base of Meat Head to make him more presentable. Place directly on your Halloween party table. If you aren’t using Meat Head right away, wrap him gently in plastic wrap and set in the refrigerator. Just make sure to warn any house guests about the scary surprise they might find staring at them from the fridge! Or don’t…it is Halloween after all!
Meat Head can be left alone as a scary centerpiece, but he is technically edible! Your guests can feel free to peel layers off of Meat Head to eat on a cracker…and they will discover the “bloody” surprise underneath the meat as they do so. I used ham for my Meat Head, but you can also use other lunch meat varieties to create different looks. Next time, I am going to try using corned beef for a more jagged, shredded look.
There are so many more amazing and fun recipes on the menu for our Trick-or-Treat #SundaySupper Halloween Party: make sure you check them out for some inspiration!
Bewitching Brews:
- Shrunken Heads in Cider – Girlichef
- Candy Corn Martini – The Messy Baker Blog
- Trick-or-Treat Wine Pairings for Halloween – ENOFYLZ
Ghoulish Gruel:
- Steak Bites with Bloody Mary Dipping Sauce – I Run for Wine
- Eggs in Purgatory – My Catholic Kitchen
- Mini Jack-o’-Lantern Sloppy Joe Pies – Small Wallet Big Appetite
- Baked Mummy Cheese Dogs – In the Kitchen with KP
- Meat Head – Ruffles & Truffles
- Goblin Eggs – Bobbi’s Kozy Kitchen
- Mummy Hot Dogs – Damn Delicious
- Spooky Kid Pizzas – Sustainable Dad
- Pumpkin Chili, Pumpkin Dip, & Wicken Witch’s Brew – Daddy Knows Less
- Monster Mash – Cindy’s Recipes & Writings
- Sloppy Worm Sandwiches – La Cocina de Leslie
Haunted Snacks:
- Gory Green Monster Eyeball Dip – Shockingly Delicious
- Marinated Mozzarella Eyeballs – Comfy Cuisine
- Eyeball Pinwheels – Home Cooking Memories
Spooky Sweets:
- Pumpkin Whoopie Pies with Biscoff Cream – The Girl in the Little Red Kitchen
- Spooky Ogre Eye Cookies – The Realistic Nutritionist
- Jack O’ Lantern Cookies – Magnolia Days
- Spooky Good Popcorn Snack Mix – The Weekend Gourment
- White Chocolate & Coconut Dipped Strawberry Ghosts – Sue’s Nutrition Buzz
- Monster Bites – Cravings of a Lunatic
- Vegan Halloween Sugar Cookies – Hezzi-D’s Books & Cooks
- Monster Cookies – Dinners, Dishes, and Desserts
- Tunnel of Doom Cake – That Skinny Chick Can Bake
- Candy-Stuffed Rice Crispy Treat Pumpkins – Chocolate Moosey
- Crispy Graham Bones – The Meltaways
- Dulce de Leche Bat Cookies – Crispy Bits & Burnt Ends
- Witch’s Fingers – Noshing with The Nolands
- Sweet Intestines with Broken Glass – The Little Ferraro Kitchen
- Graveyard Brownies – The Wimpy Vegetarian
- Boo Candy Corn & Chocolate Chip Cookies – Hip Foodie Mom
- Bleeding Devil Cakes – Momma’s Meals
- Pumpkin Halloween Munch – Big Bear’s Wife
- Halloween Peanut Butter Cookie Dough Cake Pops – Juanita’s Cocina
- Jack-O-Lantern Carrot Cake – Galactosemia in PDX
- Ghostly Chocolate Orange Tarts – Happy Baking Days
- Messy Monster Cookies – MarocMama
- Bewitchingly Delicious Butterscotch Broomstick Cake Pops – Mama.Mommy.Mom.
- Halloween Popcorn Cake – Pippis in the Kitchen Again
- Witches Morning Gruel – In the Kitchen with Audrey
- White Chocolate & Dulce de Leche Ghosts – Vintage Kitchen Notes
- Peanut Butter Candy Bar Cookies – The Cookie A Day Challenge
- Monster Cookie Revel Bars – Baker Street
- Halloween Cereal Bars – Basic N Delicious
- Ossi di Morti (Bones of the Dead Cookies) – Webicurean
- Pumpkin Pie Pinwheels – Midlife Road Trip
So – what do you think? Will you be creating your own Meat Head for Halloween this year? Have you made any scary centerpieces before?












This is amazing! I found a similar one on Hostess with the Mostess, but I like yours even better. The red jello is a creepy surprise. I’ll definitely be trying my hand at a “meat head” for our party this weekend 🙂
If you make one, I want to see pictures!!! 🙂
This. Is. Awesome. Also, I am now craving ham.
Thanks, Steph! I was really sad to destroy him…
So gross, but so cool! Love how it turned out!
-Alyssa
The Glossy Life
This is so very scary – brilliant!
That is too cool!
Oh my gosh! Meat head is so cute and so lurid! I love him/her!
LOVE LOVE LOVE Mr. Meat Head!
Creepy but quite cool!
I can’t tell you how fabulous this is!
The kids are going to love it!
Thank you, 🙂
That is a pretty creepy centerpiece! Love it, great imagination! Happy #SundaySupper!
Oh my gosh – this is so much fun, I LOOOOVE IT! I’m gonna have one heckuva halloween party with all of the fantastic ideas I’m seeing today =)
There were so many great ideas this SundaySupper!
Now that is ghoulish grub. Love it, very creative!!
Oh my gosh. I think this is the best Halloween party treat that I’ve ever seen! LOOOOVE meathead!
Thanks for the kind words, Jen! It was so fun to make this little guy!!!
I know I already commented on Mr. Meat Head but I have to say hello again 🙂 I love him so much!
this is so creepy but so cool! Fantastic!!
Wow, this is awesome, you should be proud! Happy Sunday!
Thanks so much, Paula! 🙂
How frightening!!!! Perfect for the Halloween Party Centerpiece 🙂 Your tutorial is fantastic! Congratulations and thank you for sharing this scary meat head!!!
Thanks for the kind words, Bea! I was pretty darn happy with how he turned out!
I have to say that is the most awesome use of jello and deli meat I have ever seen! I think it would be great in the center of an antipasto platter as well.
That’s definitely another great idea for his display! Yum….
Ooh ! This is so craetive. Would make a great centerpiece 🙂 Edible too ! Ingenious !
OK is it possible to be creepy and cute? I love this idea!!
That’s what I was thinking – he’s creepy, but the smile definitely makes him look cute!
I think the ham is perfect–it really looks like blood soaked bandages! Creepy!
That skeleton is seriously creepy with the bloody flesh!
This is super creative and fun! You did a really great job…
Okay, this is genius. I love it! Happy Halloween.
You had a lot of fun with this!! Thanks for sharing such a fun, creative idea. This goes way beyond “uh, waiter, there’s a bug in my salad” 🙂
I was really hoping to scare my husband with it in the fridge, but alas, I only succeeded in scaring MYSELF when I would forget he was in there and opened up the door!
I’ve been wondering how this would look since you shared with me it was sliced ham. It’s better than I imagined! It’s looks great!
That is seriously GHASTLY but also awesome in it’s own rite! Holy cow!
Thanks Karen! I was so happy with how he turned out…
This is very creative, freaky but very creative.
How creepy and creative!
This is such a great DIY project! Perfect center peice for a Halloween Party!
This would make an awesome centerpiece! I’m not sure if I would want to eat him though LOL poor meat head
A ghoulishly brilliant Halloween centrepiece! Love it!
Very scary Katie! I’m going to hide in my closet now!
Very cute! Great for any Halloween party.
OMG, I love this!!! Not sure I would want to eat “Meat head” but dude- this is AWESOME for the table!!! I love this and loved your step by step tutorial! 🙂
Haha – I think that ended up being the general consensus – no one wanted to eat him…he was too magnificent (or scary?)! That’s ok though…he was a great centerpiece!
This is SO cool! What a great party idea! I can see my hubby and boys peeling away the layers of skin without a care…but I might be too creeped out…LOL.
What a spooky treat!!! My boys would flip if they I put this on the table…a must try for me!
I’m so glad you like it, Stephanie!
This is just so cool! Love how over the top and perfect it is for Halloween!
oh my gosh…this is so scary!!
Disgustingly cool. I love this idea. It’d be wicked for parties.
[…] Meat Head at Helpful Homemade […]
[…] Halloween Meat Head | Helpful Homeade […]