

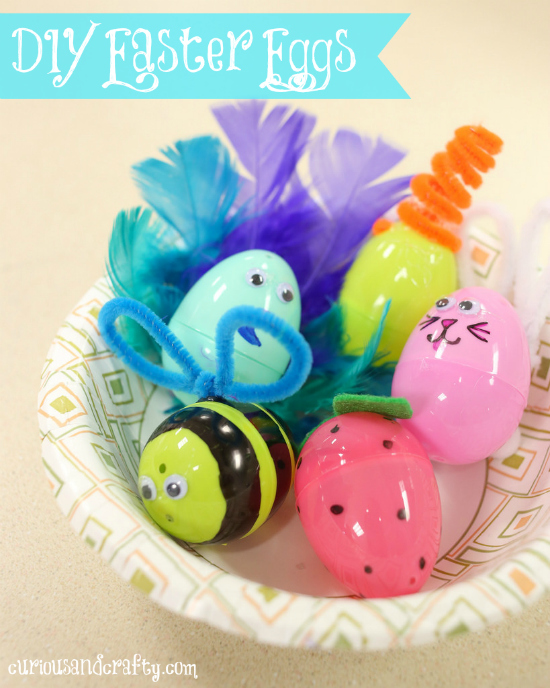
I hope everyone had a wonderful Easter Sunday yesterday. Do you happen to have a bunch of plastic Easter eggs leftover in your house today? My students over at Curious & Crafty put together a plethora of adorable egg ideas. Perhaps if you have a few moments to get crafty this week, you can turn some of your leftover Easter eggs into cute works of art!
Click HERE for the tutorial!
Happy Monday, everyone!
We hope you had a very happy Easter weekend! Now that your Easter eggs have been emptied of their candy and treats, do you know what to do with them?
Instead of packing them away in a box or throwing them away, why not use some creativity and make a few of them into something fun and adorable? You only need a few inexpensive items to get you started, as well as your imagination!
We sat around our crafting table and got to work on quite a few different egg variations! We used hot glue to add feathers, pipe cleaners, and googly eyes…we used permanent markers to add designs, to draw beaks, and more!
We created animals, we created fruit, we created Easter baskets…they turned out very well! If you have some time for crafting in the next few days, consider making a few of these for yourself!
What did YOU craft for Easter?
DIY Plastic Easter Eggs
Materials
Plastic Easter eggs
Pipe cleaners
Googly eyes
Feathers
Permanent markers (various colors)
Pom poms
Hot glue/glue gun
Felt
Your creativity!
Instructions
1. Turn on your hot glue gun to preheat. Set your materials out on the work surface.
2. To make a strawberry, use a black permanent marker to draw small polka dots on a pink Easter egg. Cut two leaf shapes from green felt, and use a few dots of hot glue to attach the felt to the wide side of the egg. Allow glue to dry. You can also use green pipe cleaners to create the leaves!
3. To make a bird, select a few feathers in the color of your choice. Add a small dot of hot glue to the bottom of each feather and attach the feathers to the wide end of an egg. Cut 6 small lengths of pipe cleaner (about one inch long) to create the feet. Use hot glue to attach them to the bottom of the egg. On the opposite side of the feathers, carefully glue two googly eyes on the top half of the egg (toward the pointed end). Use a permanent marker to draw a beak shape underneath the eyes to finish the bird!
4. To make a basket, use permanent markers to draw a basket design on the bottom side of a plastic egg. Select two colors of pipe cleaner and twist them together. Bend the pipe cleaners into an arch to make the basket handle, then use hot glue to attach the ends to the inside of the egg. Then, hot glue colorful pom pom balls into the basket!
5. To make a bunny, cut a pipe cleaner in half to create ear shapes. Bend each pipe cleaner in half to create ear shapes, then use hot glue to attach them to the top of an egg (the pointed end). Use the hot glue to attach a white pom pom to the back side/bottom of the bunny (to make a tail). Attach two googly eyes to the front of the egg, then use the permanent markers to draw a nose, mouth, and whiskers to finish the bunny! You can also add white pom poms to the front bottom of the egg to make feet!


Add Comment